Pi-hole: Local DNS, Public DOH
Using Pi-hole and Cloudflare's new 1.1.1.1 and 1.0.0.1 public DNS servers together is a good idea... bolting DoH (DNS over HTTPS) onto that via the Cloudflared daemon is an even better idea (until Pi-hole natively supports DoH anyways).
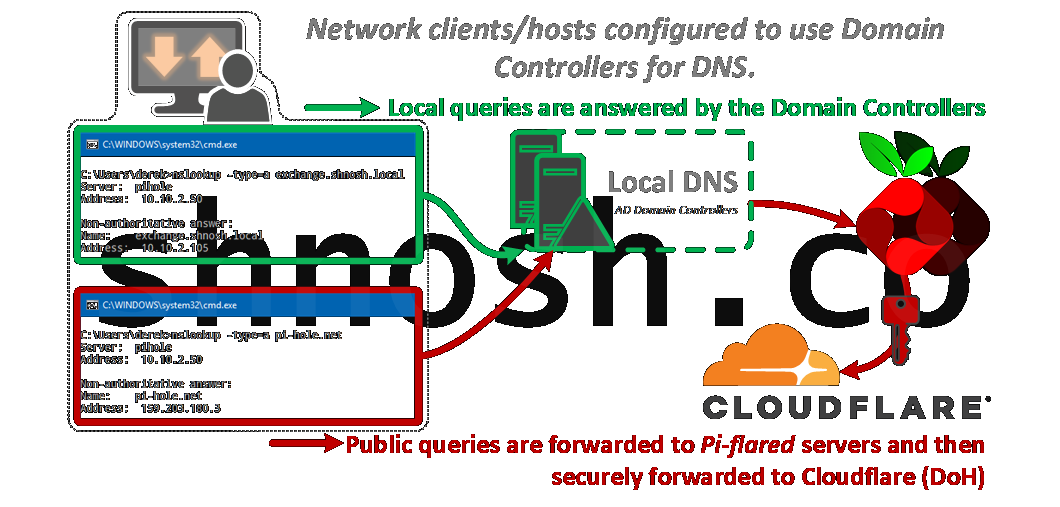
This raises an issue in any environment where local DNS resolution is needed; i.e. active-directory (AD) domain environments. In a typical AD environment there are at least two domain controllers (DC) that fulfill DNS resolution for local domain endpoints. DNS on these DCs is then configured with Forwarders so public DNS resolution can be fulfilled.
Here are a couple ways to utilize Pi-hole and Cloudflared, I'll call it Pi-flared, to reap the benefits of DoH for public DNS resolution and still use our DCs for local DNS resolution.
Option 1
AD DNS servers, or DCs, have the Pi-flared DNS server(s) configured as Forwarder(s).
- Pros: No configuration changes are required; e.g. DHCP scope options or statically defined DNS servers, etc.
- Cons: Since all DNS queries are going to the DCs first, Pi-hole's query logs will only show the requests as forwarded from the DCs; i.e. granular, per-user metrics will not be available, via Pi-hole anyways.

Option 2
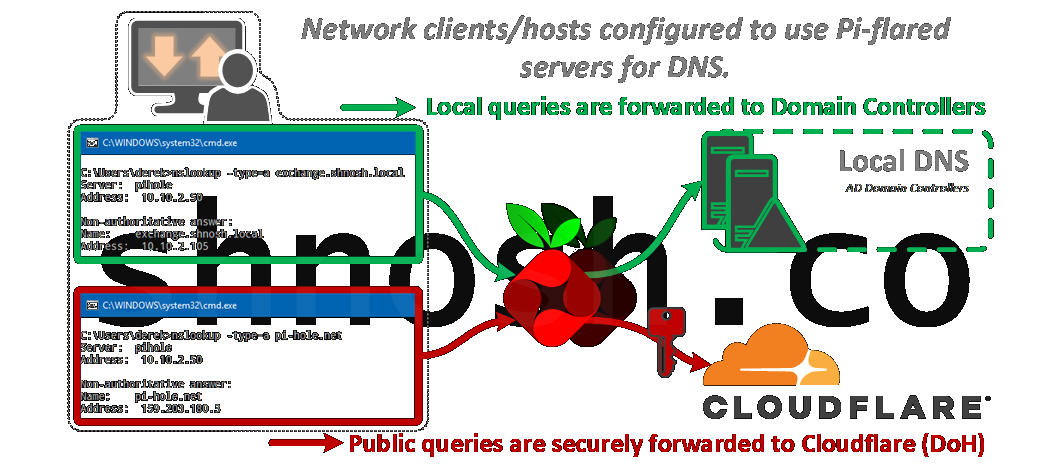
(My preference) Clients are configured with the Pi-flared server(s) for DNS, the Pi-flared servers are then configured with domain-specific servers for local lookups.
- Pros: Local domain queries will be handled by the DCs and Pi-hole's query logs will now show public queries from every host on the network.
- Cons: Reconfiguration of static clients and DHCP scope or server options to define the Pi-flared DNS server(s) for DHCP clients. This will provide the granular, per-user metrics that I want to see in Pi-hole's admin interface.

Process Order
Steps below require root privs (note the # prompt), or sudo privileges if logged in as a different user.
Install Ubuntu on your Pi
Follow the setup guide on the distro page to get Ubuntu installed on your Pi.
Install Pi-hole
This command is straight from Pi-hole's site, where they advise that piping to bash can be dangerous and suggest that you review the code and run the installer locally.
Install Cloudflared
Full disclosure, the steps below are almost directly borrowed from Ben Dew's DNS Over HTTPS post that I followed to get my Pi-hole/Cloudflared environment setup. I'm merely sharing my version of the deployment.
-
Download and untar the latest stable release.
-
Copy the extracted files to
/usr/local/binand set permissions to allow execution by the cloudflared user. -
Create a
cloudflareduser to run the daemon. -
Create a configuration file for the Cloudflared options, this will be referenced in the systemd script created later.
Paste the following into buffer, then hit CTRL-X and Y (to save).
-
Update permissions for the config file and the Cloudflared binary to permit access for the
cloudflareduser created eariler. -
Create a systemd script to control the service and allow it to run at startup.
Paste the following into buffer, then hit CTRL-X and Y (to save).
[Unit] Description=Cloudflared DoH Proxy After=syslog.target network-online.target [Service] Type=simple User=cloudflared EnvironmentFile=/etc/default/cloudflared ExecStart=/usr/local/bin/cloudflared proxy-dns $CLOUDFLARED_OPTIONS Restart=on-failure RestartSec=10 KillMode=process [Install] WantedBy=multi-user.target -
Enable the new systemd script to run on startup, start the service, and finally check its status.
Configure DNS
-
Edit the Pi-hole dnsmasq.d configuration file and add
server=lines for the Cloudflared daemon for public queries, and your DCs for local domain(s) queries.Edits... Note that
:is not used in the configuration file to define the server port, instead#is used.Example;
- Cloudflared daemon: 127.0.0.1#5053 (we just set this up)
- Primary DC: 10.1.1.51
- Secondary DC: 10.1.1.52
- Local domain name: shnosh.local"
- Comment out any
PIHOLE_DNSlines in the Pi-hole configuration file with#.
nano /etc/pihole/setupVars.conf
Edits...
This prevents Pi-hole from automatically regenerating the dnsmasq configuration files when reloaded.
- Comment out any line starting with
server=in any other file in the /etc/dnsmasq.d directory.
This step can likely be skipped if this is a clean deployment.
Completion
Restart the Pi to make sure all changes are applied, and then configure network clients to use your newly configured Pi-flared server(s)
reboot now
